Create Contractual Land Bookings
Watch the video for an introduction to Land Booking creation.
Then follow the step-by-step instructions below.
0.0 Start booking creation
-
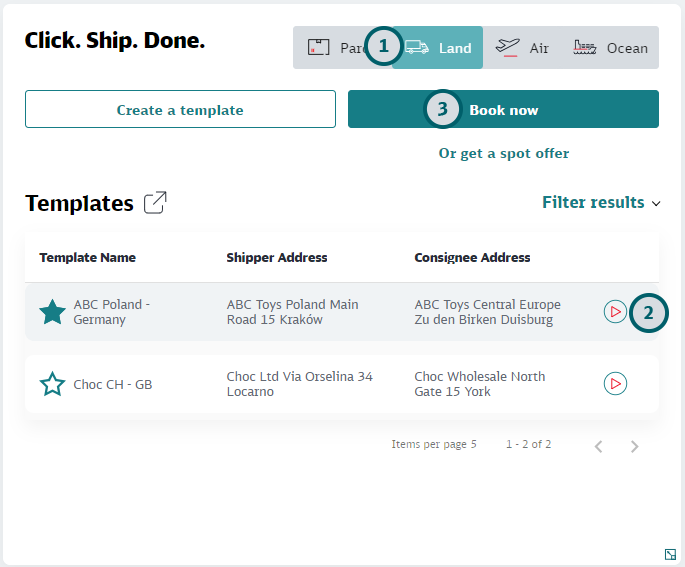
Click on the Transport Mode for which you want to create a Booking
Click on Land to start a Land booking.
-
If needed, select a template for the booking
If you have a suitable template for the creation of the new booking click on the
 icon to have the fields pre-filled with the values from the template.
 -
If no suitable template is available, click "Book now"
None of the fields of the booking mask will be pre-filled.
0.0 Enter address details
-
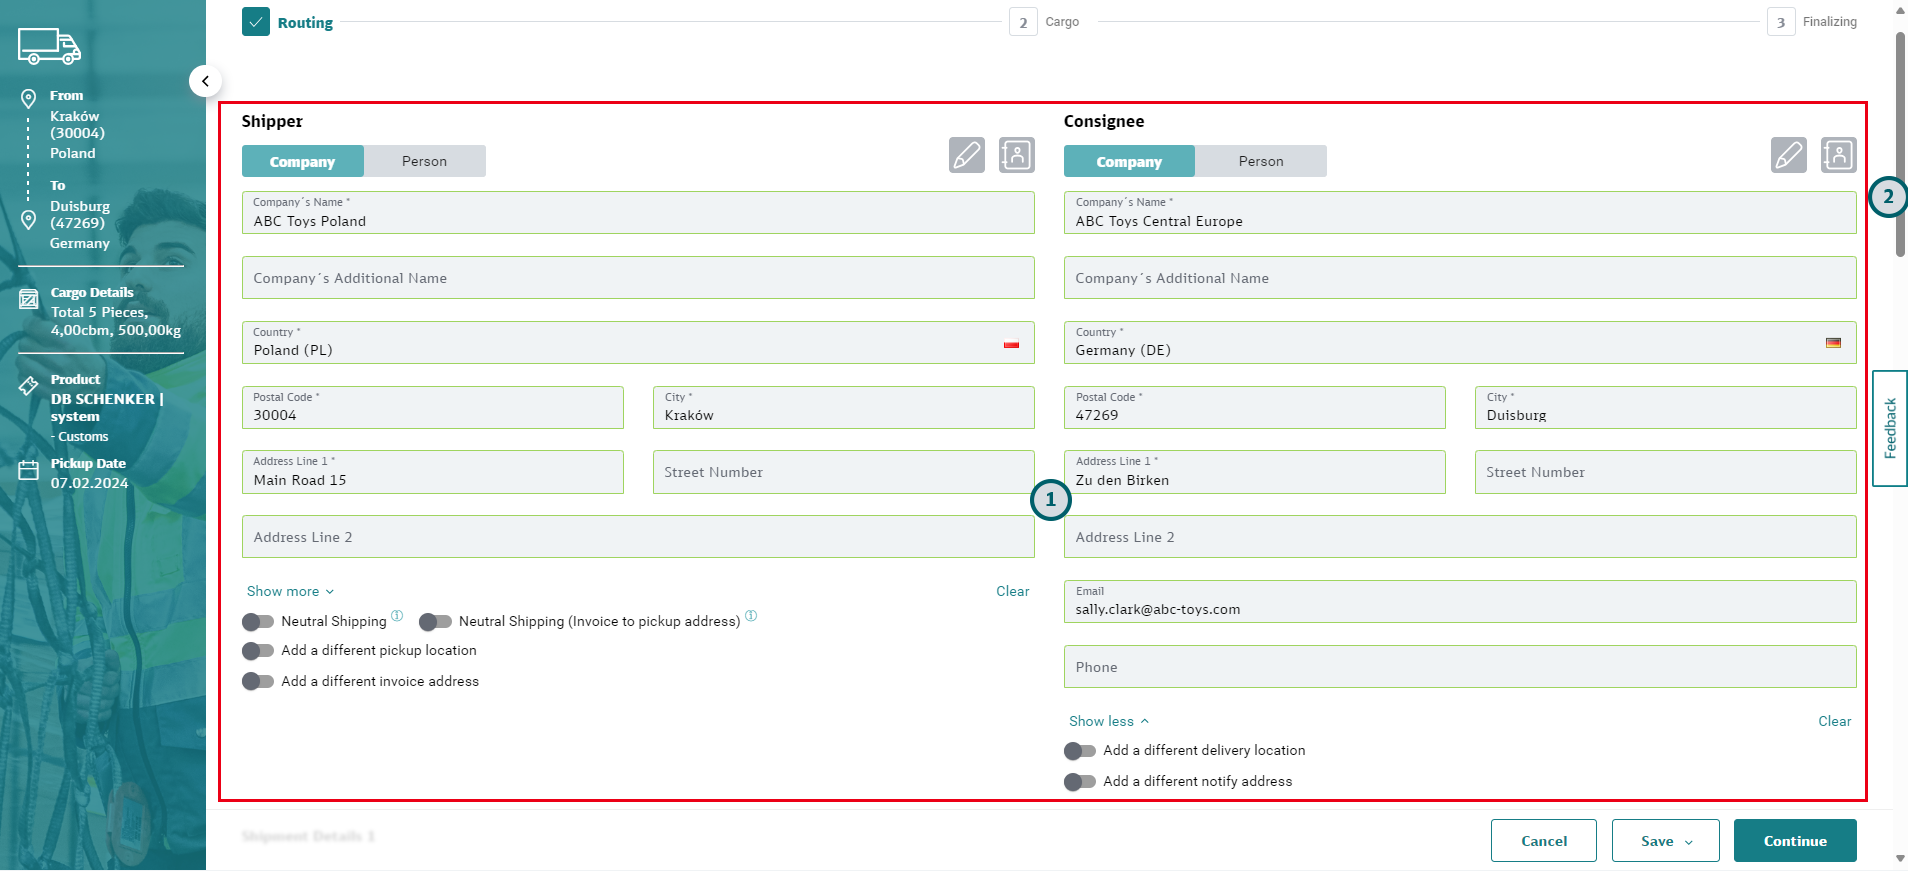
Enter all relevant details in the address area
In the address fields, enter an address into the fields, search for the addresses from your Address Book, or create a new address in the Address Book. See Using the Address Book for instructions on how to use the Address Book.
-
Mandatory Addresses: Shipper and Consignee address are mandatory. It is possible to select the same address for Shipper and Consignee: if this is the case, then you must add a different Pickup and / or Delivery Address. Click "Show more" to add an email address and / or phone number for the address.
-
Optional Addresses: All other address types are optional, but they may have been configured as mandatory fields for your user group. Up to six address types can be entered: Shipper, Consignee, Pickup, Delivery, Notify and Invoice address. Use the toggle buttons to add more address types or remove address types that are not needed.
-
Neutral Shipping / Neutral Shipping (Invoice to pickup address): This option is available for selected countries. If you select "Neutral Shipping", you must specify how you want the invoice to be delivered. You can have the invoice sent to the real shipper (Pickup Address) or the invoice can be sent to a selected freight payer or based on Incoterm. This depends on your configuration.
-
-
Scroll down for the shipment details
0.0 Add cargo details
-
Enter Cargo Details
Add all relevant information on the first shipment position to the fields in this section. The system will check if the weight, volume and dimensions are within the accepted range for the package type you selected.
-
Add more shipment positions
If more than one shipment position belongs to your booking, you can either click the "+" icon to add a new empty shipment position, or you can use the copy icon
 to copy the entry above and then adjust the values.
 -
Select if cargo is stackable
Use the toggle button to indicate if this shipment position is stackable.
-
Select if cargo contains dangerous goods
Use the toggle button to indicate if this shipment position contains dangerous goods. If you select this option the dangerous goods section will appear where you have to enter details of the dangerous goods contained in this shipment.
-
If needed, enter dangerous goods details
If you have indicated that the shipment contains dangerous goods, you must enter the details in this section. Based on the UN code most fields are filled automatically. Enter values into the remaining fields and mark selection boxes as needed.
-
If needed, change the settlement basis
Depending on your configuration the settlement basis may not be selectable.
-
If needed, change transshipment setting
Use the toggle button to indicate that this shipment may not be transshipped.
-
Scroll down to the product selection
0.0 Select product and product options
-
Select product
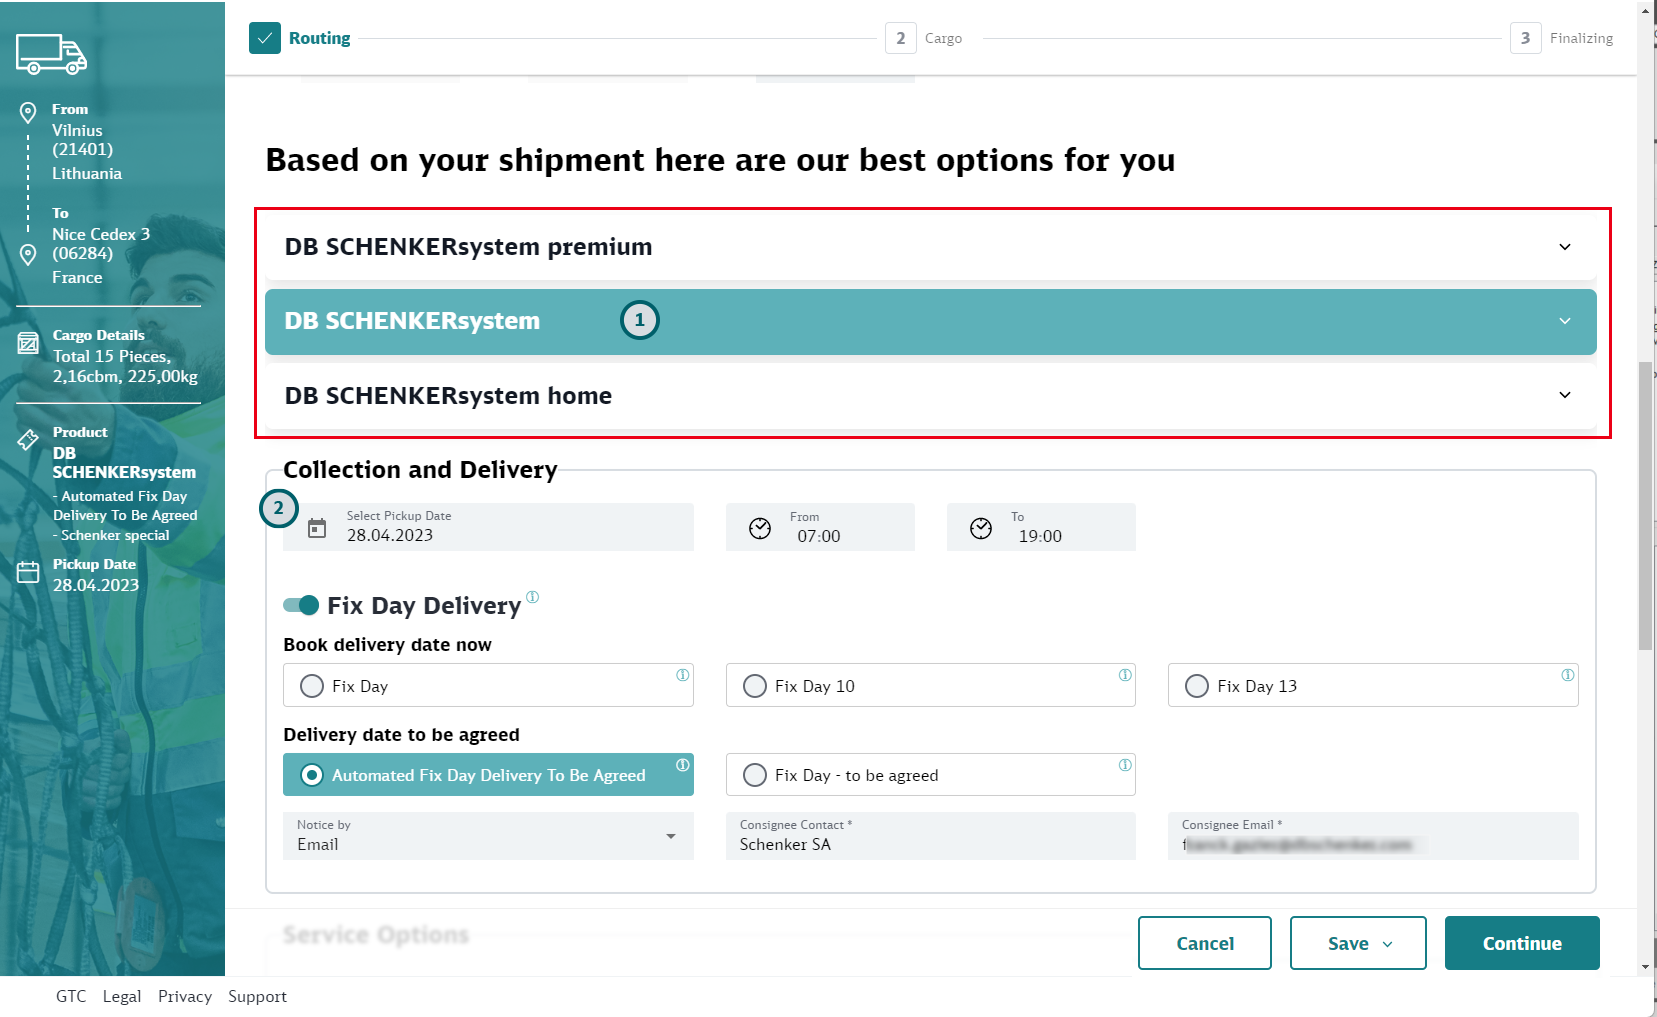
Based on the cargo details you have entered, all suitable Schenker products are shown. Select one of them.
-
Define collection and delivery options
Depending on the product you chose in the step above the available delivery options will be displayed. Choose those options that suit you best. If any additional information is required for the option, additional entry fields may appear. Fill them in.
-
Scroll down for the service options
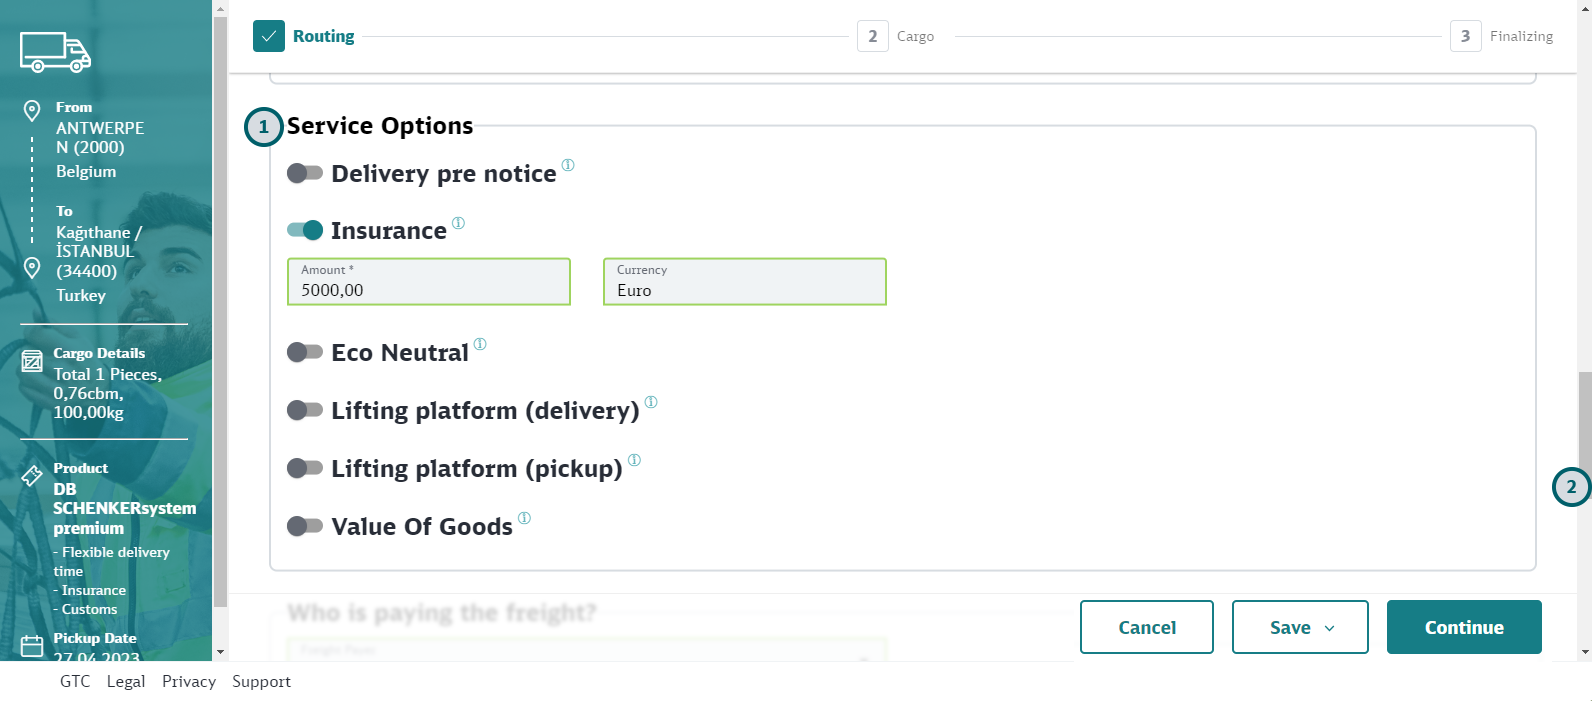
0.0 Select service options
-
Define service options
Use the toggle button to define the service options for the booking. Depending on the option selected, you may have to enter additional information (for example, if you select "Insurance" as an option, you must specify the insurance amount).
Note that the availability of service option depends on the transport mode, product and configuration of your user group. -
Scroll down to finalize the booking
0.0 Finalize booking
-
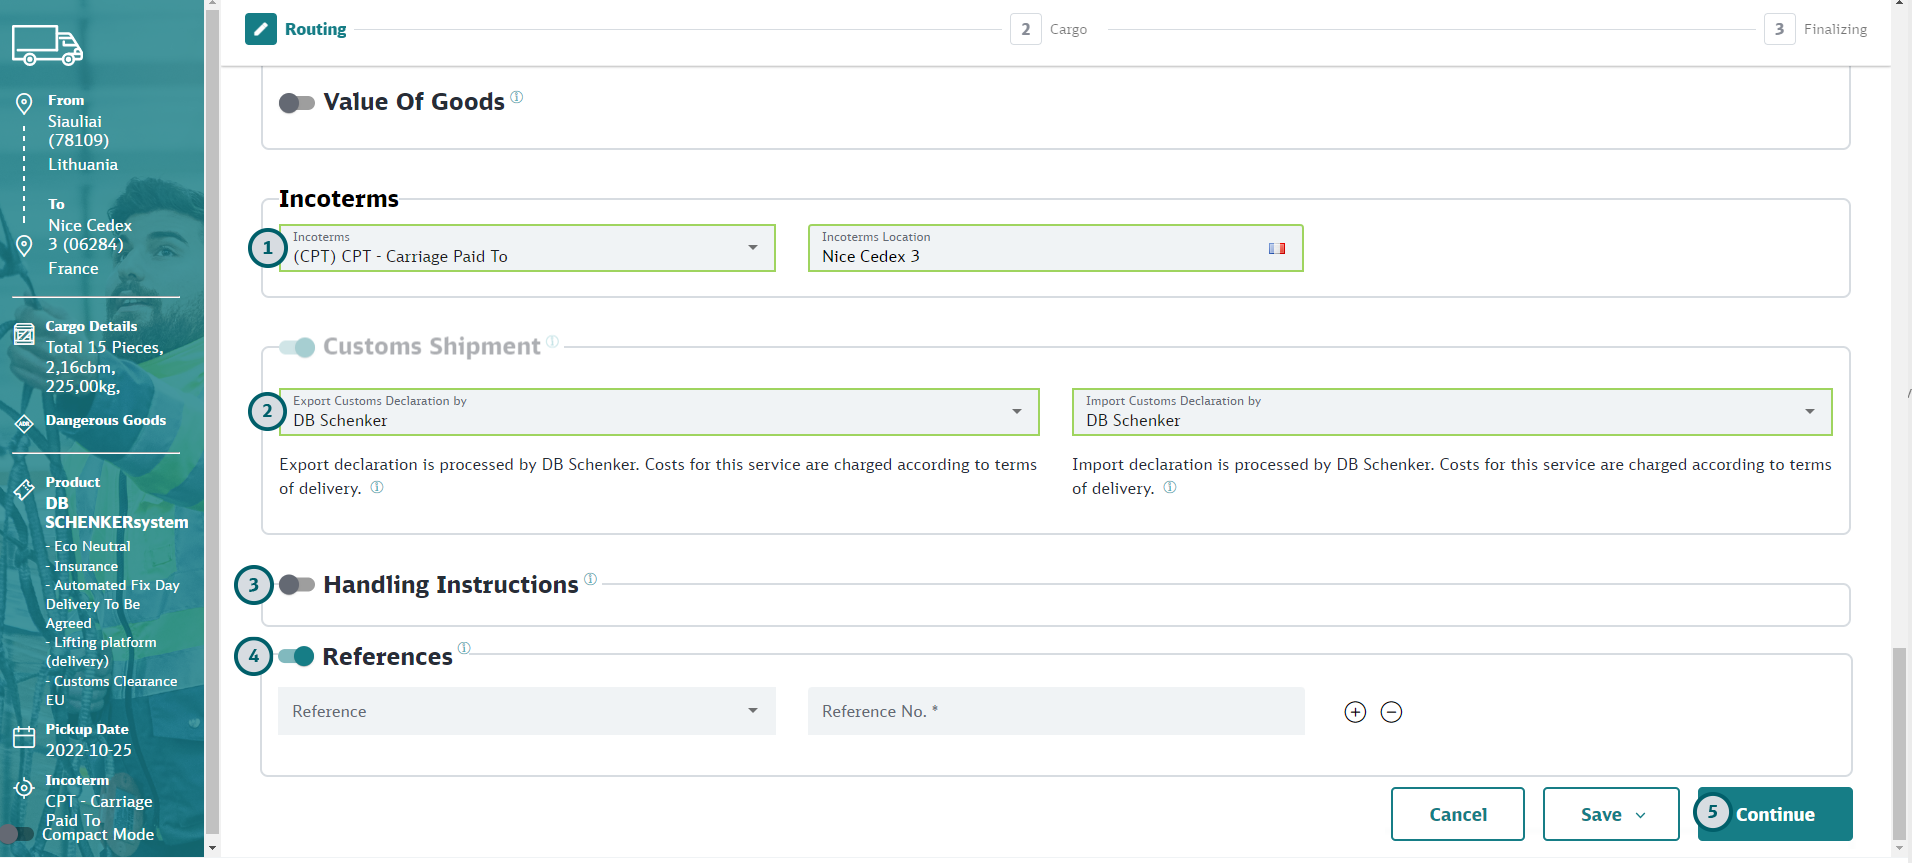
Select the Incoterms / the payer for the freight
Depending on your type of booking you must either define the Incoterms, or you must define who pays for the freight.
-
If you see the Incoterms section (like in the screenshot): Select the Incoterms from the menu. The location will be defaulted.
If needed, you can change the defaulted location.
-
If you see a section labeled "Who is paying for the freight?": Select one of the options from the list (Shipper, Consignee, 3rd Party).
If freight is paid by a 3rd party, you must provide an invoice address.
-
-
If needed, define customs details
Customs declaration details are mandatory if the shipment will enter or leave the EU. The Customs option cannot be deselected for those cases. For shipments within the EU, you can select the customs option, if needed.
Select a customs option from the list. If customs declarations are done by a third party, enter the contact details. -
If needed, enter handling instructions
If there are any handling instructions for the booking in general, or for pick-up and / or delivery, use the toggle button to select this option and enter the details.
-
If needed, enter references
Use the toggle button, if you want to enter references for your booking. Select the reference type from the menu that appears and enter the reference value into the Reference No. field. Use the "+" and "-" buttons to create more references or remove them. Depending on your user group settings, it may be possible to select the same reference type multiple times.
-
Click Continue
You will now be forwarded to the booking summary, where you can check all details of the booking before submitting it.If you want to save your entries for later or save your entries as a template for other bookings, click Save instead. Then select the option you want from the menu.
0.0 Submit booking
-
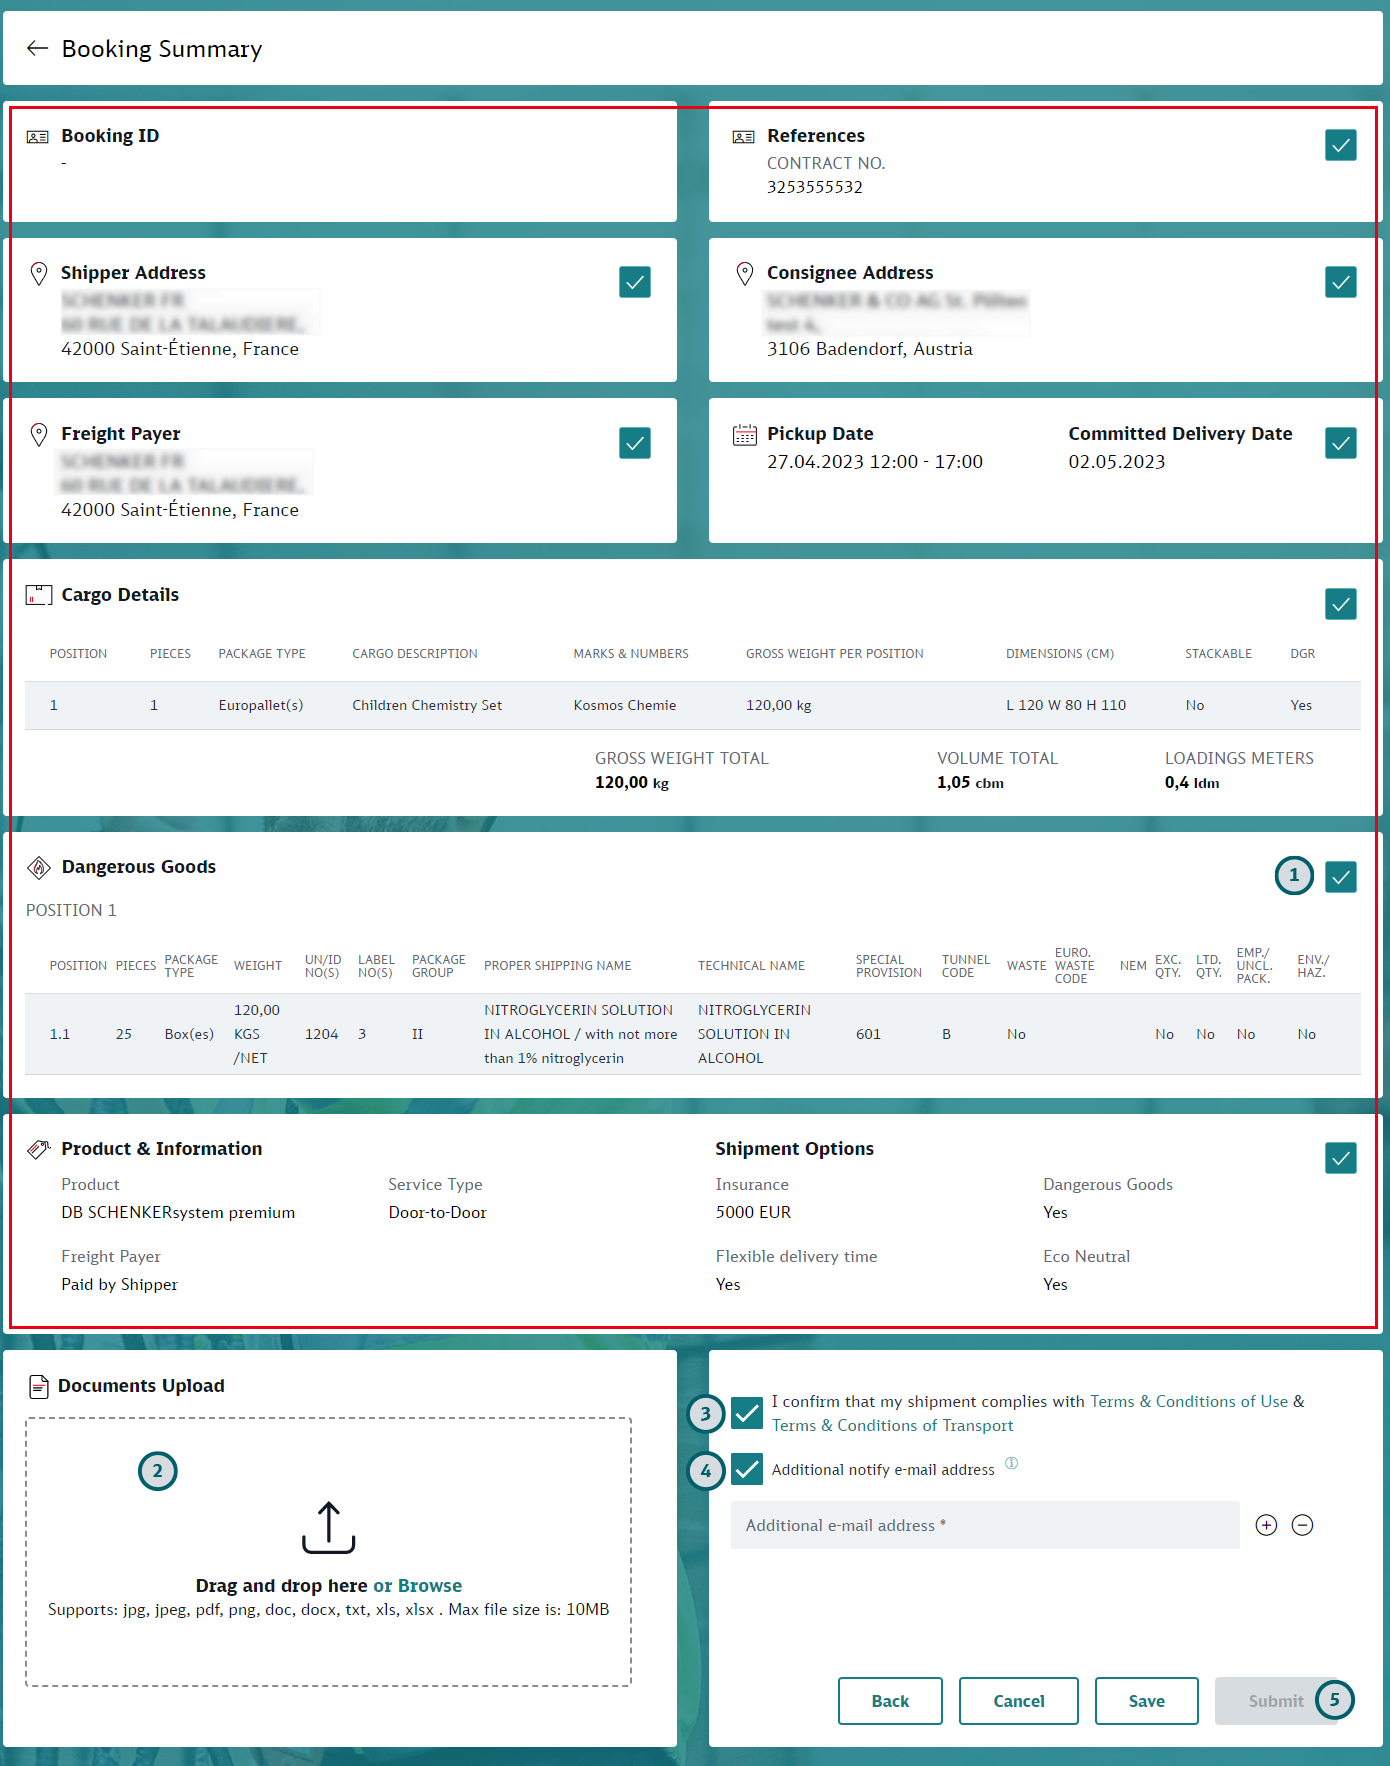
Check booking details
Do a final check of the information you have entered on the previous page. If you want to edit the details of a section click on the
 icon of the section in question. You will return to the previous page, with the section that you want to edit open.
 -
If needed, upload document(s)
Drag-and-drop a document to the upload section or click the "Browse" button and navigate to a document. Then specify what type of document the uploaded file is (for example: Commercial Invoice, Dangerous Goods Documents, Packing list).
Repeat the process, if you have several documents you need to upload.
-
Accept Terms and Conditions
Read the Terms and Conditions, then mark the checkbox. Depending on your configuration the box may be preselected.
-
Add additional notify email addresses
By default, an email confirmation is sent to the email address defined in the customer account. Furthermore the responsible branch will receive an email notification, which contains the customers country code to identify the bookings origin.
If you want any additional email addresses to receive an email notification when the booking is submitted, mark the checkbox and enter an email address in the field that appears. If you want to add more addresses, click the "+" icon.
-
Submit your Booking
Click the Submit button to finalize your booking.
If the booking has been created successfully, email confirmations are sent, as described in the step above.If you do not want to submit your booking now, choose one of the buttons below.
-
Back: Click the “Back” button to return to the previous page where you can edit the booking.
-
Cancel: Click “Cancel” to leave the booking without saving. You can select to go to the DB Schenker | connect dashboard or to My Shipments.
-
Save: Click “Save” to save your booking and edit it another time, or to save the booking as a template. Note that "Save" will not transmit the booking data to the Schenker Transport Management System.
- Save For Consolidation: If configured for your group, this option allows you to consolidate "DB Schenker System (43)” and “DB Schenker System Premium (44)” land bookings. Depending on your configuration, consolidation and submission will be done either automatically or manually:
Option 1: Consolidation takes place automatically at a certain time: If no suitable booking are found for consolidation, the booking will be submitted as a standard (unconsolidated) booking at the time that is configured for the automatic submission of consolidated bookings.
Option 2: You must submit the consolidated bookings manually:
Note that you can only consolidate similar bookings (i.e. same shipper and consignee, same transport parameters). See Search and Maintain Bookings for details on how to consolidate bookings manually.
-
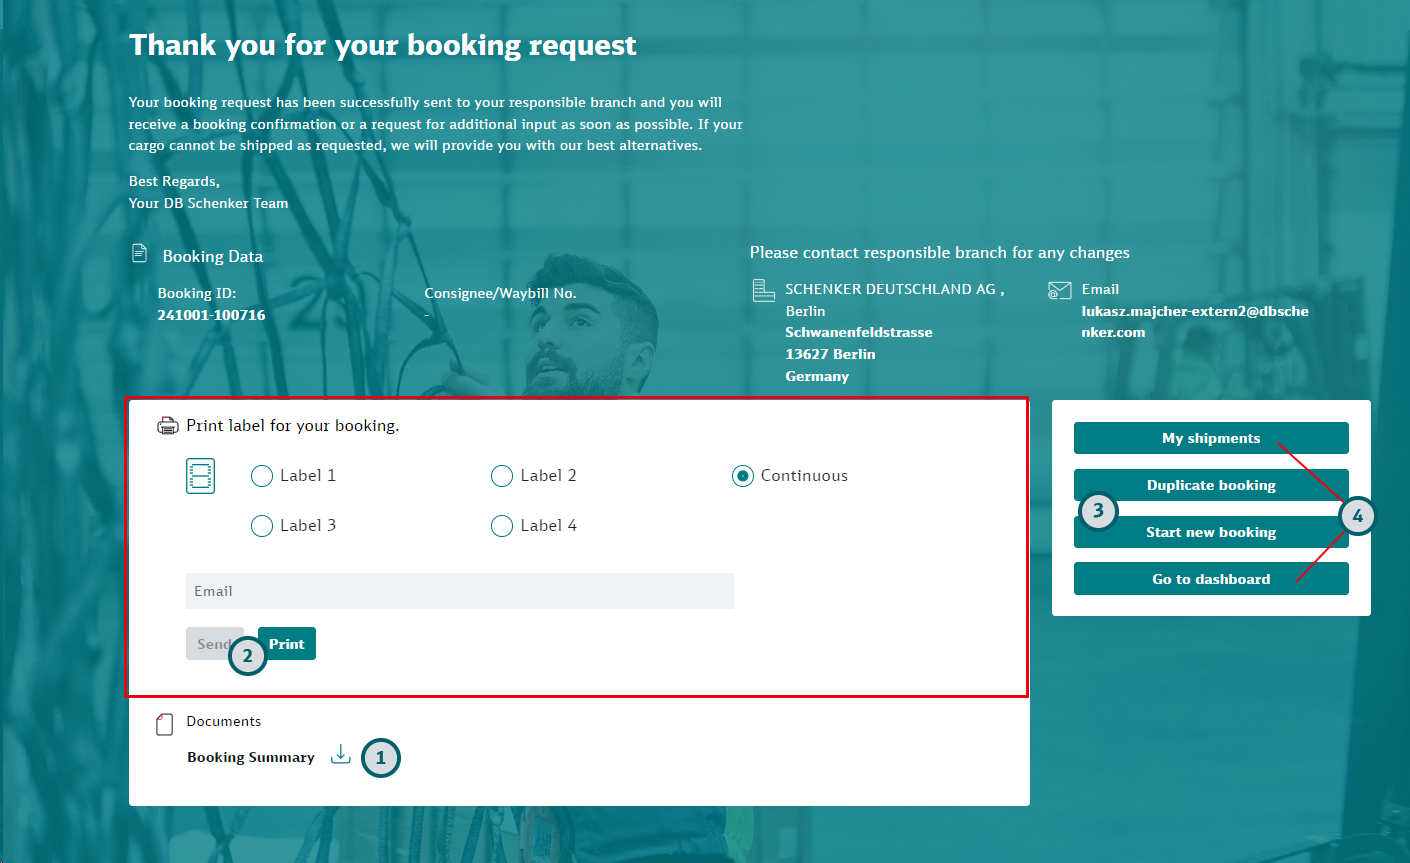
0.0 Check confirmation
Your Booking is now completed. The Confirmation page offers you additional options regarding your booking.
-
If needed, download the Booking Summary pdf
This is the same document that is sent to your email address.
-
If needed, generate labels
Select in which position the first label will be printed.
For example, if you choose Label 1, the first label will be printed on top left of the page; if you choose Label 2, the first label will be printed on the top right of the page. If you choose “Continuous” the generated pdf labels will be suitable for printers creating continuous print-outs.
You have now two options to generate labels:
-
Print button: Opens the pdf containing the labels directly from your browser.
-
Send button: Sends the pdf containing to the labels to the email address you have entered above.
-
-
If needed, create further bookings
-
Start new booking: Use this button to start another booking from scratch.
-
Duplicate booking: If you have a similar booking use this button to create a booking with the entries of the previous booking. Adjust the values as needed.
-
-
Return to the My Shipments page or to the DB Schenker | connect dashboard, if you do not want to create any further bookings
If you need to download the Freight List, you can do so My Shipments page. See Search and Maintain Bookings for further details.